Summer Ratatouille

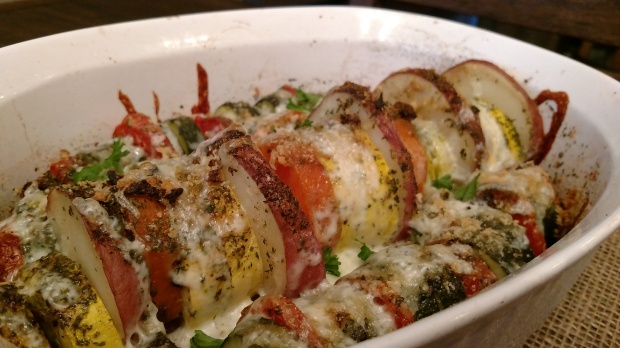
Talk about the ultimate veggie dish! First of all, what is ratatouille? It’s a mix of seasonal vegetables, cooked down with garlic and olive oil. In other words, heaven! You truly can use any vegetable of your liking and they don’t have to be baked. You can place them in a foil pan and grill them, which would be bring awesome flavor to summer meal! (Also, super easy clean up!) Below is what I used but feel free to substitute any veggies to what you may like.


Summer Ratatouille

Serves up to 4

  • 2 large Red potatoes (sliced)
  • 1 Long, skinny sweet potato (peeled and sliced)
  • 1 large Yellow squash (sliced)
  • 1 large Zucchini squash (sliced)
  • 3 Roma tomatoes (sliced)
  • 1/2 cup Parmesan cheese (grated)
  • 3 garlic cloves (finely diced)
  • 1/4 Olive Oil
  • S & P to taste
  • 3 tbsp Fresh parsley (chopped)


Spray a large casserole pan or foil pan with a non stick oil. Pre heat the oven to 400° and begin arranging the veggie slices to your liking. The slices for all the veggies should be the same width; about 1/4 inch thick or thinner. Work from the inside out so that way any empty spots can be filled in with extra veggies. Once they are arranged, pour the olive oil and garlic over all of the veggies. Sprinkle on your S & P, parsley, and parmesan cheese.

Cover the casserole dish or foil pan and bake the ratatouille for a half an hour. Remove the cover or foil and cook for another 10-15 minutes. Remove the casserole from the oven and let it cool for about 10 minutes. This will allow everything to settle and also make it easier to remove from the pan. Note: if you are grilling, maintain the temperature on the grill to 325°-350°. Otherwise the bottom may burn. As always, serve and enjoy!

IMG_20170420_192531862


Cheesy Beef Enchiladas

Ever since my husband and I lived in Texas, we have had a love for all Tex-mex food. Whether it be tacos or and tamales, we enjoy all parts of this cuisine. The food loving person that I am, enjoy learning how to make all of it along with some tricks and secrets along the way. When you add warm and spicy to cool and fresh, it just makes for a wonderful relationship that you can’t just forget. Please, try this recipe and you’ll see exactly what I mean!

Cheesy Beef Enchiladas

Serves 4

  • 1 1/2 lbs Ground Beef (73%-80% lean)
  • 1 pkg Burrito size white flour tortillas (or homemade recipe in blog)
  • 2 cups Colby jack or mild cheddar cheese (shredded)
  • 1 medium White onion (diced)
  • 2 Garlic cloves (finely diced or grated)
  • 3 tbsp Fresh parsley (each tbsp separated)
  • S & P to taste
  • 1/2 tsp Garlic powder
  • 1/2 tsp White sugar (optional)
  • 1 small can Diced green Chiles (mild)
  • 1 large can Red enchilada sauce (any brand you prefer)
  • 1 can Black beans (drained and rinsed)
  • Toppings- diced tomato, shredded lettuce, green onions, sour cream, etc. Plus any additional sides-refried beans, rice, guacamole, etc.


First, preheat a large skillet, on medium heat and begin cooking the beef. As it is cooking , break the meat into smaller pieces. About half way through add in the onion, garlic, S & P, 1 teaspoon of parsley, and garlic powder. Turn the heat down slightly, and continue cooking until the meat is cooked completely and onions have started to soften. Add in a teaspoon of diced chiles and stir. Remove the cooked beef from the heat and set aside.


IMG_20170406_172015579


Next, remove the burritos from the package or container and place on a flat surface to begin the filling process. Place the meat, drained black beans, shredded cheese, and casserole dish in an assembly type line. Mix the remainder of the chiles into the enchilada sauce and add to the assembly line as well.

First, place about 1/3 of a cup of the cooked meat onto a tortilla. Next, add in about 2 tablespoons worth of black beans and about the same amount of cheese. From one end to the next, roll the burrito up carefully and place into the casserole dish. Repeat this process until the casserole dish is filled. The enchiladas should be packed tightly together. Next add on the mixture of enchilada sauce and chiles to the top along with tomatoes and green onions(if desired). Place additional cheese on top and bake for about 20-25 minutes at 375°. If you can cover the casserole dish do so or cover with foil. (If not, they will dry out quickly.) Remove the cover for the last 5 minutes of cooking time.

Remove the pan from the oven and let the enchiladas set for approximately 5 minutes. If not, it may make it difficult to remove them when serving. Once they have cooled, serve with any of your favorite topping and sides. As always, enjoy!

IMG_20170406_182834_670

Feel free to add additional spices such as oregano and cilantro


Grilled Iceberg Salad

What is there to say about a salad, drizzled with balsamic vinegar, grilled to perfection, and consumed ever so quickly? It’s so delicious that you don’t realize that with each bite, your senses are punch with smoky flavors you can’t get with just an ordinary salad. It takes about 5 minutes, from start to finish and you can change it how ever you would like.  And for those of you asking, does it stay warm? Does the lettuce wilt? The answers are no.  Read my recipe below and try it! You’ll see!


Grilled Iceberg Salad

1 head serves 4

Balsamic Vinegar Dressing (glaze)

  • 1/8 cup EVOO
  • 4 tbsp Balsamic vinegar
  • Pinch of S & P
  • Pinch of Sugar
  • Pinch of Garlic powder

Salad Fixings

  • 1 head Iceberg lettuce (quartered with root attached)
  • 3 tbsp Blue cheese dressing (per wedge)
  • 1 large Tomato (diced)
  • 1 medium Cucumber (peeled and diced)
  • 1/2 cup Croutons
  • Additional fixings (optional: bacon bits, blue cheese crumbles, toasted pecans, pear or apple slices, cheddar cheese, etc.)


Indoor grill or outdoor grill (preferred)

Preheat the grill to about 250°-275°.  Put all the ingredients of the glaze into a container that closes tightly. Shake for about 30 seconds or until completely mixed. With a basting brush,  coat all the sides (except for the rounded outside) of the lettuce. Place the lettuce onto the grill for about 30-45 seconds. Repeat on the other side and remove from the heat immediately.  Do not put the grilled lettuce in the refrigerator; that will make it wilt. Set the lettuce aside and let it cool at room temperature for a couple minutes.

After the lettuce has cooled, add any additional ingredients of your liking and serve.  Tip: when the lettuce is on the grill, you should be able to smell the balsamic vinegar and when that smells goes away, the lettuce is ready to be removed from the heat.

IMG_20170416_185430_446


Simple Cream Puffs

What can I say? These little desserts are light, airy, simple, creamy, and delicious. They are perfect for a party or a sweet date night in. Share them or don’t! Cream puffs look so hard to make but truly they are so simple! Although, I love the traditional ones, (that are pictures above) my husband, would prefer chocolate on the inside. You can add orange cream to the center and dip them in ganache or make cannoli filling for an Italian night. Any way you decide to make cream puffs, they are so good and the recipe below will show you how simple they are to make! Even for those not too good at baking. Give them a try!

Simple Cream Puffs

Makes approximately 20

<

p style=”text-align:center;”>

Dough

  • 4 Eggs plus 1 egg mixed for glazing tops
  • 1 Stick unsalted butter
  • Dash of salt
  • 2 tsp Sugar
  • 1 tsp Vanilla extract
  • 1/2 tsp Almond extract
  • 1/2 tsp Cinnamon and nutmeg (optional)
  • 1 cup Water
  • 1 cup AP flour

Filling

  • 1 Large box of cook and serve pudding (vanilla)
  • 1 1/2 cups Milk
  • 1 tsp Vanilla extract
  • 1 pint Whipping cream
  • 1 tsp Confectionary sugar
  • 3 tbsp Confectionary Sugar (decoration)


First, in a medium size kettle, pour in the milk, the contents of the pudding packet, and the vanilla. Stir and bring to a boil on medium heat. Once the pudding has thickened, remove from heat and let cool. Transfer the warm pudding into a container with a lid, and place in the refrigerator for 1 hour.

Next, in a large mixing bowl, add the whipping cream and 1 tsp of confectionary sugar and whip on the highest speed. You should only have to whip the cream for about a minute or until a light fluff has formed. If you over mix the whipped cream, it will look like butter.  Place the whipped cream into the refrigerator until the pudding is cooled.

Once the pudding is cooled, gently fold the whipped cream into the pudding. This is your filling aka pastry cream. It should be light and fluffy. Put the pastry cream into a zip lock bag and cut a tip off to insert into the bottom of the puff.

For the puff, in a medium pot, melt the butter on medium heat. Once the butter has melted, add in the water, sugar, salt, extracts, spices, and flour. This should make the dough into a tight ball. Remove the pot from the heat and let it stand for 3-4 minutes. Then add the 4 eggs, one by one and stir quickly. This will loosen the dough slightly. (The dough will look like blobs until it is completely mixed) Scoop the dough into a separate zip lock back and cut a tip off to pipe the puffs onto a baking sheet.


The puffs should be about 1 inch by 1 inch and need to be on a baking sheet lined with parchment paper. Mix up the additional egg and brush on the top of each puff. This will give them a glazed look. Bake the puffs for 28 minutes at 375°.  Let them cool for 10 minutes before filling.


Now that the puffs and filling are made, poke a small hole with a butter knife on the bottom of each puff. Take the zip lock, with the filling inside, and slightly press to fill the puff. Once it is filled, you should feel slight pressure to pull it out. Place on a flat surface and sprinkle confectionary sugar on top. Store in the refrigerator until ready to serve. As always, enjoy!


Feel free to use instant pudding, if you choose. The cream puffs won’t have the same taste but they will still good.


Creamy Broccoli Cheddar Soup

When I first made this soup, I put three different milks in it and it was so heavy.  The second time I made it,  I removed two and something was missing. Finally, I came up with best combination, with few calories (in my opinion).  Some recipes have tons of veggies packed in. By all means, I truly encourage that! (kale would be awesome!)  I found though, after blending the soup, it never became quite as creamy. As always, adjust the recipe to your liking and enjoy what you’re feeding your body.


Creamy Broccoli Cheddar Soup

Serves 4

  • 1 bag Frozen Broccoli crowns
  • 2 cups Chicken or Vegetable Stock
  • 1/3 cup Half & Half
  • 1/2 medium Onion (chopped)
  • 2 Garlic cloves (diced)
  • 1/2 cup Carrots (chopped)
  • S & P to taste
  • 1/4 tsp Onion powder
  • 1/4 tsp Garlic powder
  • 1 tsp Fresh parsley (chopped)
  • 3/4 cup Cheddar cheese (shredded) plus 1/4 cup for topping


First, place the 3/4 of the broccoli, stock, onion, garlic, carrots, S & P, onion powder, garlic powder, and parsley into a pot. Cook on medium high heat until it begins to boil. Turn the heat to low and cook for another 5 minutes or until the carrots have softened.

IMG_20170307_185008964

Once the veggies are completely cooked, remove the pot from heat and use either an immersion blender or a regular blender to smooth the soup. Caution: be very careful because the soup is extremely hot and can cause burns. Blend the soup until your desired consistency. Then put the soup back into the pot and place on the stove on a low heat.

IMG_20170307_191933170

As the soup begins to heat up, add the half & half ,3/4 cup of cheese, and the remaining broccoli. Stir until everything is combined. Cook the soup until it is hot enough for your liking. Serve and top with additional cheese. Enjoy!

*This soup is exceptional with a turkey sandwich or submarine. *

IMG_20170307_194723_702


Baked Potato Salad

Being a food lover and a self taught cook, new recipes and ideas always pop into my head. There are so many versions of potato salads, especially this one, that you can really changed to what you like. When I think of a loaded baked potato, it always has sour cream, onion, bacon, and cheese on it. ALWAYS! By all means, add what you love but the following is my recipe for this reinvented potato salad.


Baked Potato Salad

Serves 4

  • 8 medium Russet Potatoes (washed, dried, and pricked)
  • 1 Celery stick (small diced)
  • 3 Green onions (chopped)
  • 4 Bacon strips (cooked and chopped)
  • 1/2 Mild cheddar cheese (shredded)
  • 1/3 cup Sour Cream
  • 3 tbsp Mayonnaise
  • S & P to taste
  • 1/8 tsp Garlic powder
  • 1 tsp Fresh parsley (chopped)


First, preheat the oven to 400° and put the baked potatoes on a baking sheet. Bake the potatoes for 35-45 minutes or until soft. Remove from the oven and cool for 10 minutes.

IMG_20170319_162722835

Once the potatoes have cooled, half them and cut them into bite size pieces. Place in a large bowl and add the remaining ingredients. Leave a small amount of cheese and green onion to top off the mixed salad.

IMG_20170319_174924382

When the salad is mixed, place it into a clean bowl, cover and refrigerate for about an hour. Serve and enjoy!

IMG_20170319_180112036_HDR


Tasty Taco Salad

I am always open to new ideas and ways of cooking meals. If it has fresh ingredients and is easy to make normally, why not try it a different way. My husband loves tacos! When I ask him what he wants for dinner, the answer is always tacos. A taco salad can be changed in so many ways by what fresh ingredients you add to it. Also, by the dressing or meat. Feel free to change it to your liking but as for this blog post, this is my recipe.


Taco Salad

Serves 4

  • 4  Flour tortillas (burrito size)
  • 1 1/4 lb Ground beef (73-80% lean)
  • 1 Garlic clove (finely diced)
  • 1 small White onion (chopped)
  • S & P to taste
  • 1/2 tsp Garlic powder
  • 1/2 tsp Onion powder
  • 1 tsp Fresh parsley (chopped)
  • 1/3 cup Ortega taco sauce (mild) plus extra for dressing
  • 1 head of Iceberg lettuce or Romaine (chopped)
  • 1 Tomato (chopped)
  • 1 Avocado (small diced)
  • 1 cup Shredded cheddar
  • 1 can Black beans (drained and rinsed)
  • 1 can Sweet corn
  • 4 tbsp Sour cream


To make the shells, preheat the oven to 375°. On a baking sheet, place a soup bowl face down. Make sure the bowl is oven safe. Put a tortilla in the oven or microwave and heat enough to just make it warm and slightly sticky. (oven-1 minute, microwave-20 seconds). Place the tortilla around the bowl and push down the sides so the fold and make a bowl shape. Spray with non cooking spray and place in the oven for 5-6 minutes or until slightly brown. Turn the broiler on towards the end to make it even crisper. Pull the baking sheet from the oven and let the shell cool a couple minutes and then remove from the bowl.

IMG_20170306_175820590_HDR

For the taco meat, preheat a skillet on medium to high heat. Cook the ground beef completely while stirring and breaking the meat up into small pieces. Add in the onion and garlic. Cook for about 3-4 minutes or until the onion is cooked. Season with S & P, garlic powder, onion powder, parsley, and the taco sauce. You are welcome to use a taco seasoning packet instead of the sauce if you prefer.

Once the meat is fully cooked and the shells are baked, add the lettuce to all the shells. Fill them about half way. Then add all of the toppings that you desire plus the meat. Add additional taco sauce or a salad dressing of your choice. Stir and enjoy!

IMG_20170306_192255_514


Authentic Chicken Wings

As a native of Buffalo, NY, I know my chicken wings. They are never, ever called Buffalo wings! That is just the sauce that is applied. With that said, chicken wings can be fried, baked, or grilled and be absolutely delicious. I have had many people tell me they want a recipe for authentic chicken wings and this one delivers! They are crispy, saucy, and pack just enough heat to make you crave them over and over. They are easy to make and be reheated just as easily if you want to make them ahead for a party. Give them a try! You’ll love them!


Authentic Chicken Wings

Coating Mix

  • 1 1/2 cups AP flour
  • 3 tbsp Corn starch
  • 1 tsp (each) S & P
  • 1/2 tsp Garlic powder
  • 1/2 tsp Onion powder

Sauce

  • 1/4 cup Franks Wing Sauce (mild) or Hot sauce (medium to hot)
  • 6 tbsp Unsalted butter

Other Ingredients

  • 24 Chicken wings (drumettes preferred)
  • 1 large container of Vegetable oil (frying oil)
  • Blue cheese dressing (dipping sauce)
  • Carrot and Celery sticks

** Deep fryer is recommended**

First, turn your deep fryer to 375° and let it heat up completely before adding the wings. Next, wash and completely dry off the chicken wings. Take 6-7 wings and put them in a zip lock bag with the coating mix. Completely coat the wings, shake the wing off to remove the excess flour and place in the deep fry basket.

IMG_20170228_182650149

Deep fry the chicken wings for 8-10 minutes or until the green light turns on. This indicator let you know they are done. Remove the chicken wings and place on a sheet pan and place in a warm oven. The excess grease will evaporate. Continue cooking the remaining chicken wings.

IMG_20170228_190650462

Once the wings are all fried, place them in the oven and begin the sauce. The sauce will only take about 3 minutes to make. In a sauce pan, heat the butter and hot sauce to a low boil. Whisk the sauce until it is combined. Remove from heat and set aside.

Pull the chicken wings from the oven and place them in a container that you can toss the sauce and wings together. A tupperware container works great. Add the sauce and close the container. Shake to coat all of the wings. Plate the wings. Serve with blue cheese dressing (not ranch), celery, and carrots. Enjoy!

IMG_20170228_192132_910


Monster Meatballs


Generally, when someone mentions Italian food, you automatically think spaghetti and meatballs. There are so many different ways to make them and believe me, I am not here to say any of them are better/worse than others. I have made small meatballs, stuffed meatballs, pork meatballs, and monster meatballs. By far, these are my favorite to make and eat. Why? Because not only are they great with spaghetti and fill you up but they are amazing on a submarine sandwich. Give this recipe a try and you will see just what I’m talking about!


Miranda’s Monster Meatballs

Makes 9 large meatballs

  • 1 1/2 lbs 73-80% Ground beef
  • 1 small White onion (diced)
  • 2 Garlic cloves (finely chopped)
  • 2 Eggs
  • 1 tsp Worcestershire sauce
  • 2 tbsp Dark Bourbon (optional) *non alcoholic option-milk*
  • 1/2 cup Store bought Bread crumbs (seasoned)
  • 1 slice of White bread (grated)
  • 2 tbsp Fresh parsley (chopped)
  • 1/2 tsp S & P
  • 1/2 tsp Garlic powder
  • 1/2 tsp Onion powder
  • 1/4 tsp Ground fennel
  • 2 tbsp Grated or shredded parmesan cheese
  • Your favorite marinara sauce or homemade sauce


First, preheat your oven to 400°, line a baking sheet with foil, and spray lightly with non stick spray. In a large bowl combine all the ingredients and mix with your hands. (best tools in the kitchen) Be careful not to over mix the meat because that will make the meatballs tough. Just mix the meat enough to combine all of the ingredients. Next, form into balls the size between a golf ball and a tennis ball. There is no need to be a perfectionist at this point. If the size is slightly off, it’s not a big deal. They will be put in the sauce of your choice to cook at least 15 more minutes. Once the balls are all formed, bake for 40-45 minutes.

After you remove the meatballs from the oven, let them sit, without touching or moving them for 10 minutes. This will allow the meat to set and ensure they will never fall apart. Add them to your sauce, and cook in the sauce for at least 15 minutes. Serve with extra parmesan cheese and parsley. Enjoy!

img_20170226_142927_960

Submarine sandwich- cut 1 meatball in quarters. Place on a slightly toasted sub roll. Add sauce and mozzarella cheese. Place under a high broiler for 3-4 minutes or until bubbly. I add spinach and parsley but that is totally up to you!


Chicken Wing Soup

Two staples in the Buffalo, New York area are chicken wings and soup. With Buffalo being the city with the best known chicken wings and an area that measures snow in feet, this soup totally makes sense as to why it’s popular there. I spent the first 25 years of my life growing up in a suburb of Buffalo. So, I consider myself an expert in chicken wings and their flavor. This soup is perfect for any sporting event you are tailgating at, any party, and definitely any evening you want an easy but delicious soup.


Chicken Wing Soup

Serves 4

  • 4 Chicken Thighs (seasoned and cooked)
  • 4 cups Chicken stock
  • 2 Celery stalks (chopped)
  • 2 Carrots (chopped)
  • 1 Medium onion (chopped)
  • 2 tbsp Butter
  • 2 Garlic cloves (finely diced)
  • 2 tbsp Ranch dressing
  • 1 tbsp Fresh parsley (chopped)
  • 1/2 tsp Garlic powder
  • 1/2 tsp Onion powder
  • S & P
  • 1/4 cup Franks Wing Sauce + extra for topping
  • Blue cheese crumbles (topping)
  • Blue cheese dressing (topping)
  • Rue for thickening (1 tbsp flour and 6 tbsp water, mixed)


First, preheat the oven to 400° and place the cleaned chicken thighs in a baking dish. Sprinkle with S & P and  bake for 35-40 minutes. Let the chicken cool completely. De-bone the chicken and chop into bite size pieces. Set them aside.

While the chicken is cooking in the oven, in a large pot, place the onion, carrots, celery, garlic,and butter. Cook on medium high heat for about 8-10 minutes. Stir frequently, so nothing sticks and everything begins to cook evenly. Add in half the parsley, S & P, garlic powder, onion powder, chicken broth, and hot sauce. Turn the heat to medium low, cover, and let the soup come to a boil.


Once the soup is boiling, turn the heat down to a simmer. Add the chicken and ranch dressing. The dressing will almost look like its curdling but it isn’t. It has lots of oil in it, so it is separating. Stir until it has dissolved into the soup. If you choose to thicken the soup, add in the rue and stir. You can thicken it as much as you would like but just be cautious, this isn’t a stew. Let this cook for another 5-10 minutes.

img_20170212_182421312_hdr

Ladle the soup and top with wing sauce, blue cheese dressing and crumbles, and parsley. Keep in mind, there is hot sauce in the soup but you can decrease or increase that amount if you choose and the additional on top gives an extra kick. As always, enjoy!

img_20170212_183538_642